Create a React Formspree form with Tailwind styling and Astro Islands 🚀
If you’re building a fast, high-performing static landing page, you may need to integrate forms for gathering user input. In this guide, we’ll set up a contact form in Astro—a JavaScript framework known for its speed and performance optimization. Using React for interactivity and Tailwind CSS for utility-based styling, we’ll leverage Astro Islands to build a dynamic, responsive form experience within a static environment.
Why Astro for Your Forms?
Astro’s framework-first approach helps reduce JavaScript bloat, making it ideal for static sites where performance is a priority. Learn more about its speed here.
Setting Up the Contact Form with Formspree, React, and Tailwind CSS
Astro's innovative approach to web development, combined with React's interactivity and Tailwind CSS's utility-first styling, creates a powerful stack for building modern web applications. In this short blog, I will guide you through setting up a contact form using Formspree, React, and Tailwind CSS within an Astro project using Astro Islands.
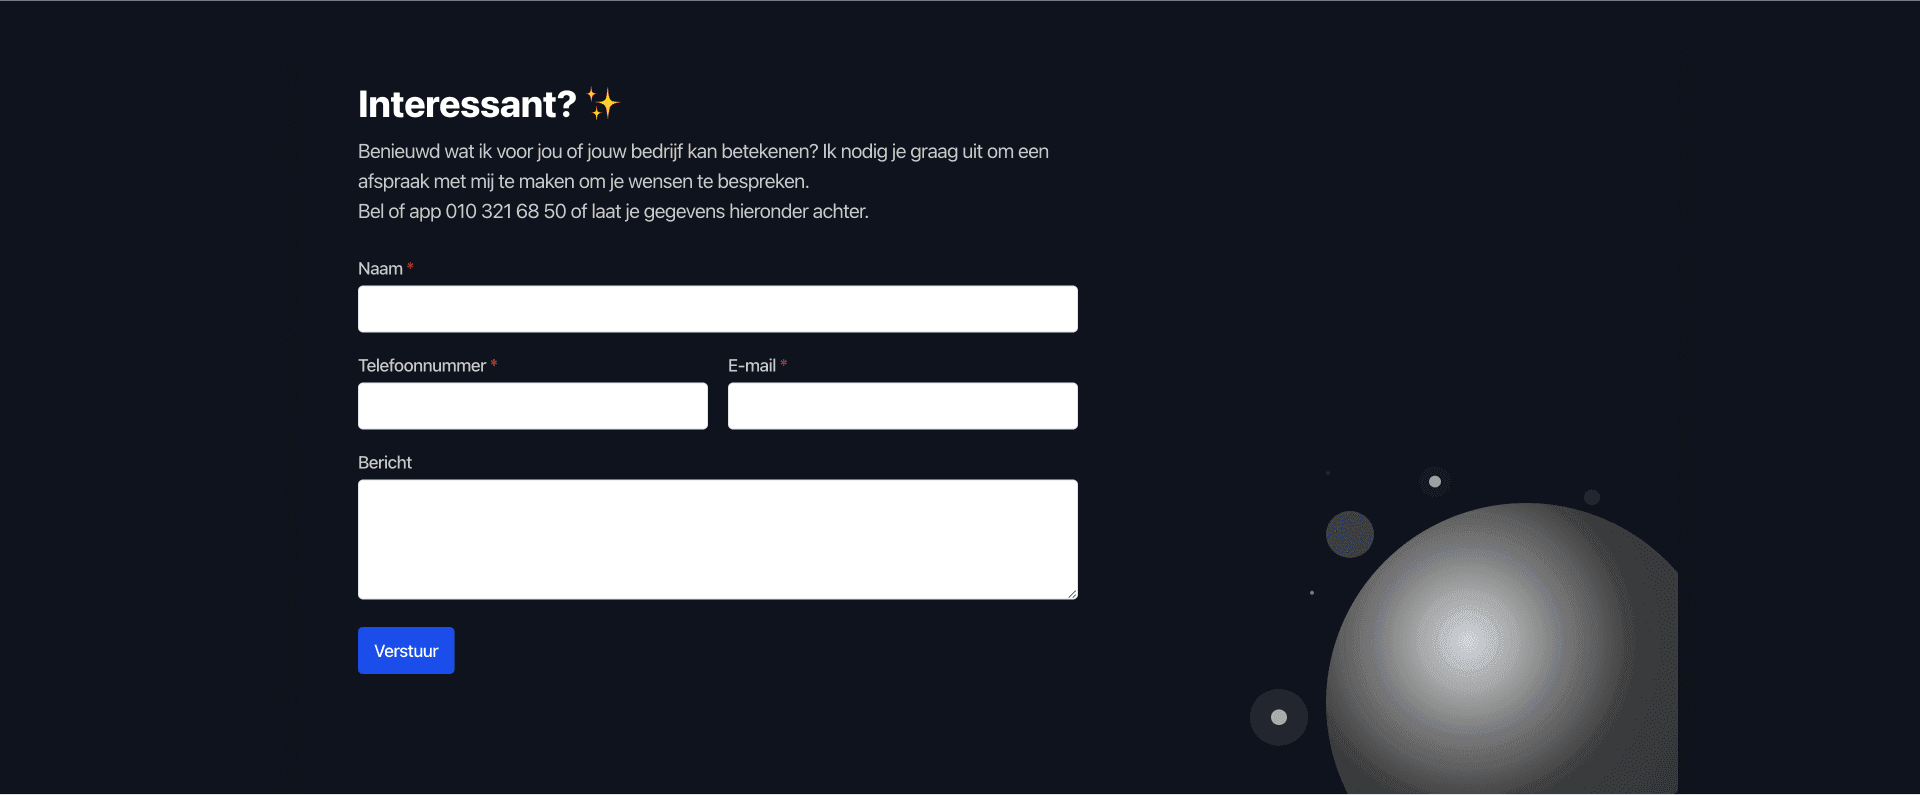
Example Form:

Assuming you already know how to set up an Astro project and integrate Tailwind CSS.
If not, there are plenty of tutorials and AI-driven guides available to help you get started. It's quite straightforward these days. 😅
Astro's Islands architecture allows us to load different frameworks into a single project, such as Svelte, React, and Vue. In this example, we'll load a React component in JSX that includes a Formspree form. Note that you will need the (official) @formspree/react package.
I have two files, Subscribe.jsx and ContactForm.jsx, both using React.
Here's a quick overview:
jsx
//Subscribe.jsx
import React from 'react';
import ContactForm from '../common/ContactForm';
const Subscribe = () => {
  return (
    <div>
      <section className="relative border-t border-gray-200 dark:border-slate-800 not-prose bg-gray-900">
        <div className="max-w-6xl mx-auto px-4 sm:px-6">
          <div>
            <div
              className="relative bg-gray-900 rounded py-10 px-8 md:py-16 md:px-12 shadow-2xl overflow-hidden dark:border-slate-700"
              data-aos="zoom-y-out "
            >
              <div className="absolute right-0 bottom-0 pointer-events-none hidden lg:block" aria-hidden="true">
                <svg width="428" height="328" xmlns="http://www.w3.org/2000/svg">
                  <defs>
                    <radialGradient cx="35.542%" cy="34.553%" fx="35.542%" fy="34.553%" r="96.031%" id="ni-a">
                      <stop stopColor="#DFDFDF" offset="0%"></stop>
                      <stop stopColor="#4C4C4C" offset="44.317%"></stop>
                      <stop stopColor="#333" offset="100%"></stop>
                    </radialGradient>
                  </defs>
                  <g fill="none" fillRule="evenodd">
                    <g fill="#FFF">
                      <ellipse fillOpacity=".04" cx="185" cy="15.576" rx="16" ry="15.576"></ellipse>
                      <ellipse fillOpacity=".24" cx="100" cy="68.402" rx="24" ry="23.364"></ellipse>
                      <ellipse fillOpacity=".12" cx="29" cy="251.231" rx="29" ry="28.231"></ellipse>
                      <ellipse fillOpacity=".64" cx="29" cy="251.231" rx="8" ry="7.788"></ellipse>
                      <ellipse fillOpacity=".12" cx="342" cy="31.303" rx="8" ry="7.788"></ellipse>
                      <ellipse fillOpacity=".48" cx="62" cy="126.811" rx="2" ry="1.947"></ellipse>
                      <ellipse fillOpacity=".12" cx="78" cy="7.072" rx="2" ry="1.947"></ellipse>
                      <ellipse fillOpacity=".64" cx="185" cy="15.576" rx="6" ry="5.841"></ellipse>
                    </g>
                    <circle fill="url(#ni-a)" cx="276" cy="237" r="200"></circle>
                  </g>
                </svg>
              </div>
              <div className="relative flex flex-col lg:flex-row justify-between items-center">
                <div className="text-center lg:text-left lg:max-w-xl">
                  <h3 className="h3 text-white mb-2">Interessant? ✨</h3>

                  <p className="text-gray-300 mb-6">
                    Benieuwd wat ik voor jou of jouw bedrijf kan betekenen? Ik nodig je graag uit om een afspraak met
                    mij te maken om je wensen te bespreken.
                    <br /> Bel of app
                    <a href="tel:0103216850"> 010 321 68 50</a> of laat je gegevens hieronder achter.
                  </p>

                  <ContactForm />
                </div>
              </div>
            </div>
          </div>
        </div>
      </section>
    </div>
  );
};

export default Subscribe;
jsx
//ContactForm.jsx
import React, { useState, useEffect } from "react";
import { useForm, ValidationError } from "@formspree/react";

function ContactForm() {
  const [state, handleSubmit] = useForm("yourformidhere");
  const [name, setName] = useState("");
  const [phone, setPhone] = useState("");
  const [email, setEmail] = useState("");
  const [message, setMessage] = useState("");

  const submitForm = async (e) => {
    e.preventDefault();
    await handleSubmit(e);
  };

  useEffect(() => {
    if (state.succeeded === true && state.errors === null) {
      console.log("Operation succeeded and no errors");
    } else if (state.succeeded === false) {
      console.log("Operation did not succeed or there were errors");
    }
  }, [state.succeeded, state.errors]);

  if (state.succeeded) {
    return (
      <p className="text-gray-300 text-lg mb-6 p-4 bg-green-600 rounded">
        🚀 Succesvol verzonden!
      </p>
    );
  }

  return (
    <form onSubmit={submitForm} className="w-full lg:w-auto text-left">
      <div className="space-y-4 mb-8">
        <div>
          <label
            className="block text-sm font-medium mb-1 text-gray-300"
            htmlFor="name"
          >
            Naam <span className="text-rose-500">*</span>
          </label>
          <input
            name="name"
            id="name"
            className="form-input w-full"
            type="text"
            value={name}
            onChange={(e) => setName(e.target.value)}
            required

          />
        </div>

        <div className="flex space-x-4">
          <div className="flex-1">
            <label
              className="block text-sm font-medium mb-1 text-gray-300"
              htmlFor="phone"
            >
              Telefoonnummer <span className="text-rose-500">*</span>
            </label>
            <input
              id="phone"
              name="phone"
              className="form-input w-full"
              type="phone"
              value={phone}
              onChange={(e) => setPhone(e.target.value)}
              required

            />
            <ValidationError
              prefix="Phone"
              field="phone"
              errors={state.errors}
            />
          </div>
          <div className="flex-1">
            <label
              className="block text-sm font-medium mb-1 text-gray-300"
              htmlFor="email"
            >
              E-mail <span className="text-rose-500">*</span>
            </label>
            <input
              id="email"
              name="email"
              className="form-input w-full"
              type="email"
              value={email}
              onChange={(e) => setEmail(e.target.value)}
              required

            />

            <ValidationError
              className="text-red-500 text-xs"
              prefix="Email"
              field="email"
              errors={state.errors}
            />
          </div>
        </div>

        <div>
          <label
            className="block text-sm font-medium mb-1 text-gray-300"
            htmlFor="message"
          >
            Bericht
          </label>
          <textarea
            id="message"
            name="message"
            className="form-input w-full"
            value={message}
            onChange={(e) => setMessage(e.target.value)}
            style={{ minHeight: "120px" }}
          />
          <div className="text-red-500">
          <ValidationError
            prefix="Message"
            field="message"
            errors={state.errors}

          />
          </div>
        </div>

        <button
          className="btn text-white bg-blue-600 hover:bg-blue-700 shadow"
          type="submit"
          disabled={state.submitting}
        >
          Verstuur
        </button>

        <ValidationError errors={state.errors}  />

      </div>
    </form>
  );
}

export default ContactForm;
To integrate the Subscribe.jsx component into your Astro layout, you can follow this straightforward example. Ensure to include the client:load directive, which is crucial for leveraging Astro Islands. 🏝️
tsx
---
//index.astro
import Layout from '~/layouts/PageLayout.astro';
import Subscribe from '~/components/common/Subscribe';
---

<Layout>
  <Subscribe client:load />
</Layout>